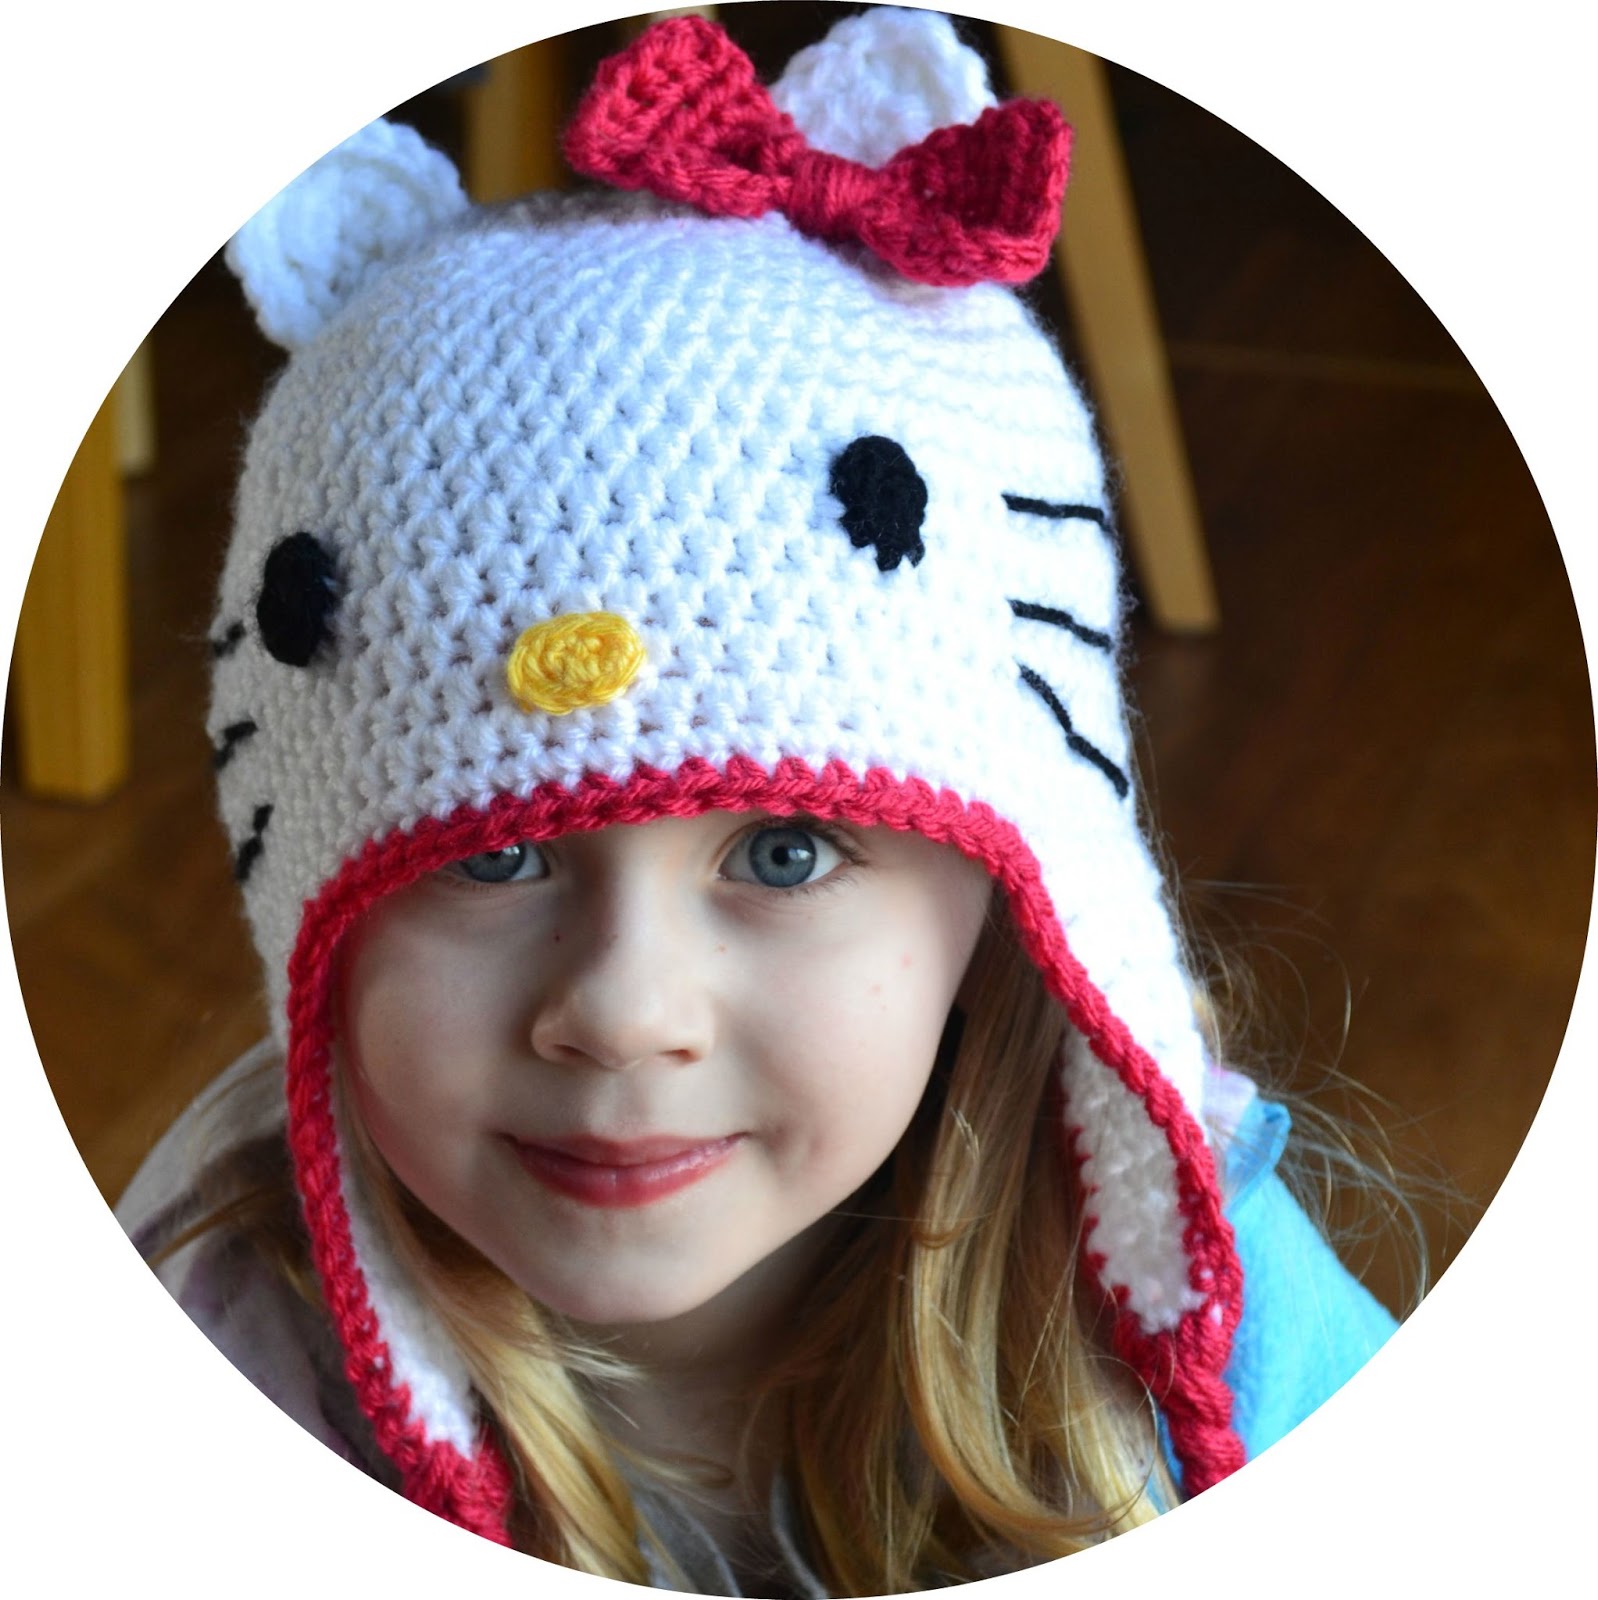

I haven't posted the new rug patterns as promised. Please forgive me for that as well. I have been struggling with a horribly nasty cold for two weeks now. It seems to get worse every day. I thought colds were supposed to improve every day:(
I've been so, so lazy this weekend...watching tv, basketball (my Tarheels). I haven't even cooked a meal. Michael went out and brought home our meals for three days now. Being sick is not all bad...hehe:D
Anyway here is the pattern and please overlook any craziness with the instructions...I wrote this up pretty quickly. I will go back over it tomorrow and correct needed mistakes. I will also take more detailed photos and post those as well.

Materials
Worsted weight yarn (I used Vanna’s Choice Baby in White and Cherry)
Small amount of black and yellow
Size G and H crochet hooks
Yarn needle
Size
Fits a small child to teen/ small adult
It is very easy to alter the size. Just take out an increase row and an even row for a toddler or add an increase row and an even row for an adult size
Edit: I have received lots of questions about sizing so I would recommend using this chart. I posted this in June.
Pattern
Note: I hate the seam. You can see it in one of the photos below. To make a seamless one, just keep going around without joining. Just keep up with your first st (marking it if you have to). When you get to the earflap just start with the singles (eliminating the join).
With H hook (G if you crochet loosely)
Rnd 1: Ch 3, 7 hdc in 3rd ch from hook. Join with sl st. (8 hdc the first 2 chains count as the first hdc of the rnd)
Rnd 2: Ch 2, hdc in same st. 2 hdc in each st around, join. (16 hdc)
Rnd 3: Ch 2, hdc in same st, hdc in next st. (2 hdc in next st, hdc in next st) around, join. (24 hdc)
Rnd 4: Ch 2, hdc in same st, hdc in next 2 sts. (2 hdc in next st, hdc in next 2 sts) around, join. (32 hdc)
Rnd 5: Ch 2, hdc in same st, hdc in next 3 sts. (2 hdc in next st, hdc in next 3 sts) around, join. (40 hdc)
Rnd 6: Ch 2, hdc in same st, hdc in next 4 sts. (2 hdc in next st, hdc in next 4 sts) around, join. (48 hdc)
Rnd 7: Ch 2, hdc in same st, hdc in next 5 sts. (2 hdc in next st, hdc in next 5 sts) around, join. (56 hdc)
Rnd 8: Ch 2, hdc in same st, hdc in next 6 sts. (2 hdc in next st, hdc in next 6 sts) around, join. (64 hdc)
Rnd 9- 17: Ch 2, hdc in next st. Hdc in each st around, join. (64 hdc)
First earflap:
Row 1: Sc in same st as join. Sc in next 12 sts. Ch 1, turn. (13 sc)
Row 2: Sc2tog over the first 2 sts, sc in each st across. Ch 1, turn. (12 sc)
Row 3: Repeat row 2, until 1 st remains. Finish off.
Second earflap
Row 1: Skip next 21 sts and attach with sl st in the next st. Ch 1 and sc in the same st and in next 12 sts, Ch 1, turn (13 sc)
Row 2: Sc2tog over the first 2 sts. Sc across. (12 sc)
Row 3: Repeat row 2 until 1 st remains. Ch 1 and do not finish off.
Work a round of sc around the hat, placing 3 sc in the point of each earflap. Finish off
Leaving approximately 12 inches of tail, attach Red to one of the earflaps. Work a round of sc around the edge, leaving a finishing tail long enough to use in the braid. I start and finish with long tails so I can use them to braid with and won’t have to weave them into the hat.
You'll notice that the earflaps are not totally centered. The front of the hat is the side where there is more space between earflaps. Make sure you take note of this when you begin sewing your eyes, nose, ears, and bow onto the hat.
Eyes (G hook)
With Black, Ch 5
2 sc in 2nd ch from hook. Sc in the next 2 chs. 3 sc in last ch. Do not turn. You will work in the opposite side of the ch. Sc in next 2 chs. Sc in last ch which is the first ch. (10 sc)
Don’t fret too much over the eyes and nose…They do not have to be exact, just small ovals.
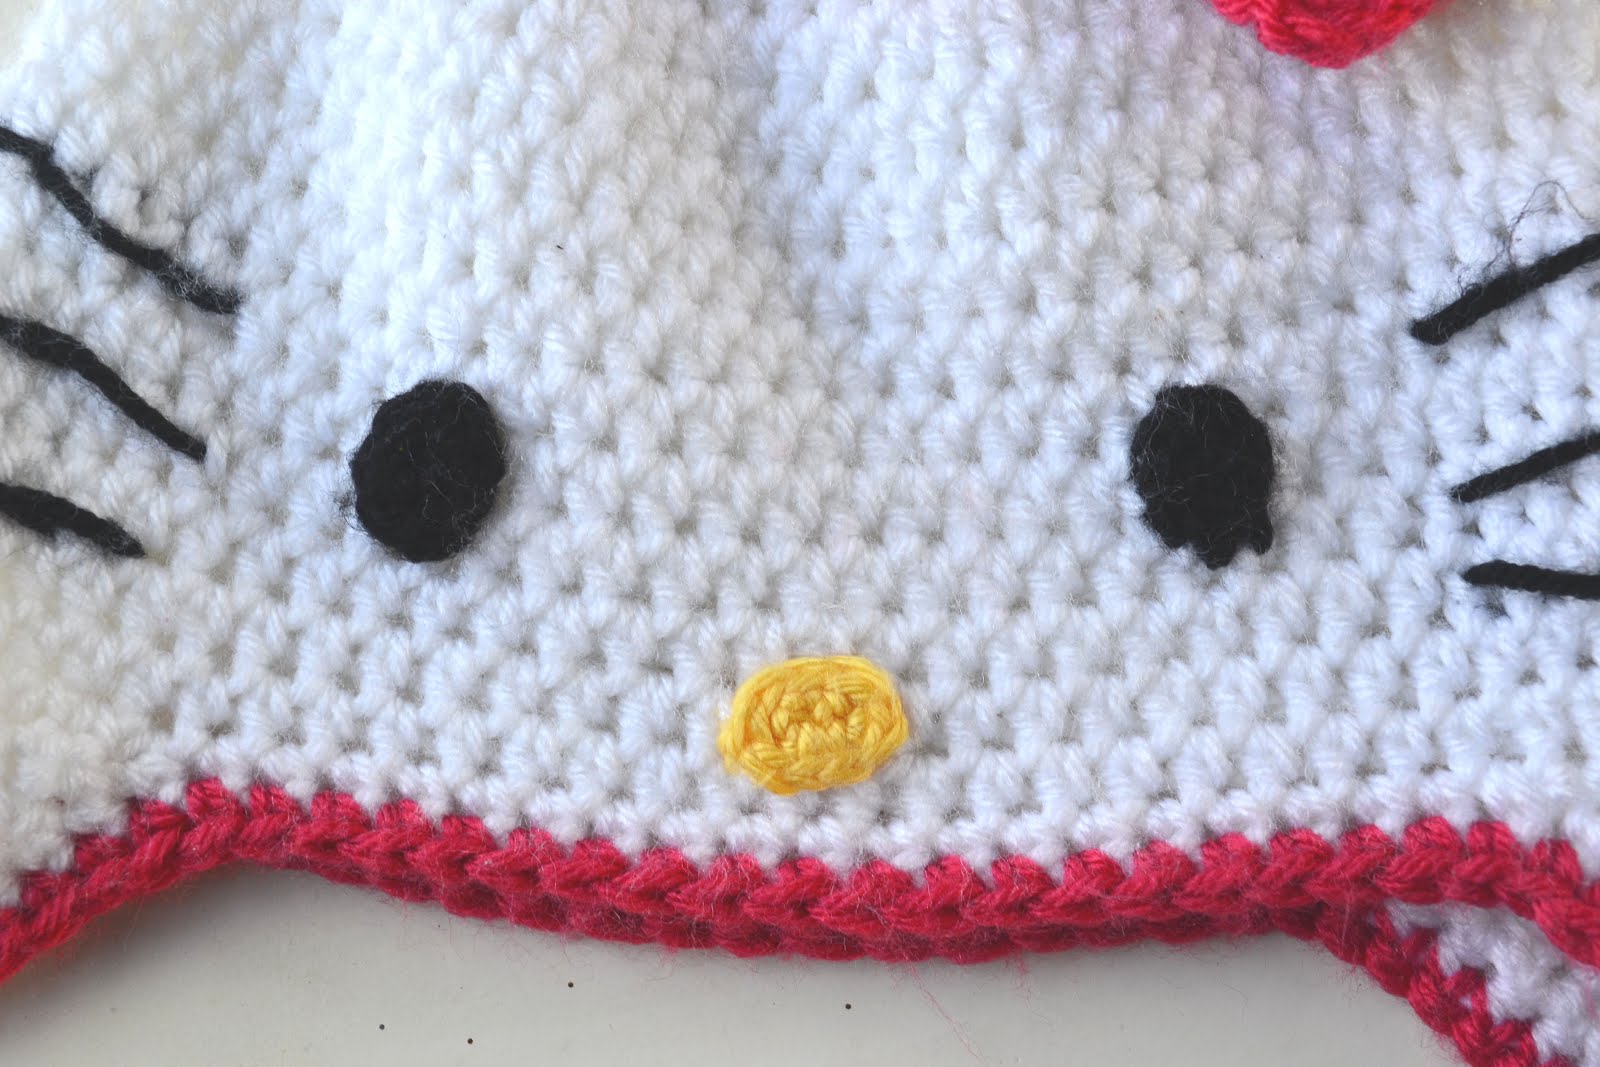
Nose (G hook)
With Yellow Ch 4
2 Sc in 2nd ch from hook, sc in next st, 3 sc in last ch. Do not turn. Work in the opposite side of the ch. Sc in next ch, sc in next st. Sc in same chain as the first sc worked. You’ll end with a small oval shape. (8 sc)
Ears (G hook) and holding 2 strands of yarn together
With White Ch 3
Row 1: 7 Hdc in 3rd ch from hook. Ch 1, turn (7 hdc)
Row 2: 2 sc in first st. sc in next st, 2 sc in next st, 2 dc in next st, 2 sc in next st, sc in next st, 2 sc in last st. (12 sts) Finish off.
Bow
With Red Ch 11
Row 1: Hdc in 3rd ch from hook. Hdc in each st across. Ch 2, turn. (10 hdc)
Rows 2- 10: Hdc in each st. Finish off
Take a long strand of Red and wrap around the middle of the bow to draw it in. Wrap several times. Tie the ends in the back of the bow. Using the yarn needle weave the ends into the bow to hide then use these same ends to sew onto the hat. Sew the middle of the bow and bottom of the bow onto the hat. I found that if you do not sew the bottom of the bow to the hat, it will curl up.
Whiskers
Use a yarn needle to embroider the whiskers. They will be straight if you work into the stitches and not in-between them.
Braids
I used only the red, but you can make them however you wish. I used 15 strips for each earflap.
Sew the eyes and nose onto the hat. Do not sew the eyes too close together. Mine may be a little too far apart. I used a picture to go by.


There you go...enjoy!
Please do not hesitate to inform me if you find mistakes, or have any difficulty with these instructions.
Im sorry to hear that your sick. I really hope you get to feeling better soon. Have you seen a dr yet? If you go I hope they give you something to take care of it. Sounds like a sinus infection you have:( I would love to try this. I will have to run out and buy some yarn to match this hat. My daughter loves hello kitty. Feel better hun
ReplyDeleteThanks so much...you may be right about the sinus infection. I hope you like the pattern:D
DeleteHow do you attach the braids to the hat?
Delete@Angie Mapp, you weave in the strands of yarn into the end of the earflaps and then you braid them , at least thats how I do it.
DeleteOh my goodness, what adorable photos! And a cute hat too. I agree with SnuggleBunnie that it sounds like a sinus infection. I lived with them for years...and it wasn't living. I finally had surgery to correct some blockages that were causing the recurring infections...haven't had any issues again. I do hope you are feeling better soon. Also sorry your fans were impatient...you shouldn't have to worry about posting patterns when you're feeling so crummy! Annette
ReplyDeleteThank you, Annette. I hope it's not a sinus thing... I had an infection in October. I'm one of those people that hates to go to the dr. I hope you have a great week:D
DeleteI love it! And so does my wee girl - who just spotted it over my shoulder. I hope you're starting to feel better soon hon - other than not having to cook, it's not much fun ay. Have a fab week.
ReplyDeleteLeah
Thanks, Leah. I hope you enjoy the pattern...and have a great week too:)
DeleteIt is so cute, thanks for sharing I will def make one for Maia when it cools down a bit! Get well soon, but rest up while you can :) Jxx
ReplyDeleteThank you and You're welcome, and I hope Maia loves it.
DeleteThat's such a pretty hat...thank you for sharing teh pattern! Hope you'll be feeling better soon! Marieke
ReplyDeleteThank you and you're welcome, Marieke. Have a great week:)
DeleteHi, I sympathise with you as I've started a cold this morning. Hope it doesn't last as long as yours and I hope you're feeling better soon.
ReplyDeleteJust to let you know I mentioned you and your crochet rug in my latest blog post.
Looking forward to the pattern :)
Maggie xx
Hi Maggie,
DeleteThank you. Of course, I do not mind if you blog about the rug. I just wish I had the pics up. I have finished the striped one but not the other. I may post the pattern and more pics today or tomorrow...probably tomorrow. I hope your cold goes away very soon...have a great week:)
Your little one would look cute with a paper bag on her head. SO sorry you are still under the weather, so you think it might be time for antibiotics? Love this hat pattern as usual you are so wonderful writing it up for all of us.
ReplyDeleteFeel better,
Meredith
Thanks Meredith, It may be time for some meds, but I'm being stubborn. I hate going to the dr and wasting a whole day. We'll see, anyway I hope you have a great week:D
ReplyDeleteliz-- hope that you feel better! colds are the worst and they seem to hang on for such a long time. thanks for sharing the pattern for this. your daughter is so sweet in it! :) she must be happy to have a mama who makes such lovely things for her. i have two boys so it's harder to find cute things that also seem to be "boyish"...
ReplyDeleteThank you so much, I'm better now. You're welcome about the pattern. I think Ireland loves that I crochet. She does like to show off her mitts and hats. Of course...it makes me feel good:D I don't have a boy, but I hear it's a whole different world. There are some great character hats for boys out there....but you're right, there's so much more for girls.
DeleteWell .. there are things like ... Angry Birds ! I know one small grandson that loves them!! Or .. Spiderman ...
Deletehello Liz,
ReplyDeletebeautiful hat ... thanks for sharing the pattern! my daughter 32 years old asked me to make one for her! She loves Hello Kitty :))
You're welcome and thank you... you're never too old for Hello Kitty. I am working in a Nursing facility and a couple of the elderly ladies there have a stuffed Hello Kitty on their beds:D
DeleteI am working on the ears but can't seem to get them right...I'm fairly new to crochet and on my fifth or sixth hat now. I keep ending up with a ear-like shape, but there is a tail from my original chain still there. Do you have any idea what I'm doing wrong?
ReplyDeleteIt doesn't sound like you are doing anything wrong. You will have that beginning chain that you'll weave into the ear. Then you'll use the other tail to sew to the hat. Let me know if I haven't answered your question.
DeleteI'm not getting this either. There is a chain of about 6 hanging from the bottom of the ear which is confusing me.
Deletethx a lots abt this post
ReplyDeleteRE: Ear - I was having a stinker of a time too with the ear, wasnt sure what to do with the left over ch's. So i came to see if this was a typo in the instructions. I see it is not. I didnt really care for weaving in that tail of left over chains, so what i did was CH 3 and then continued with the instructions. This way, i'm only weaving in the yarn and not chain. This way i only have the tails of yarn to use to sew the ears on.
ReplyDeleteLiz, i certainly hope you dont mind that i shared what i did. I just love what you are doing here. and its even more awesome that you share what you do. I very much appreciate that you share your patterns. I am finishing Hello Kitty today, and she will be mailed off to Connecticut for my great neice to enjoy.
Thank you again Liz, your work is awesome!
It is a typo in the instructions. It should say ch 3. I'm so sorry about the unnecessary stress over a little bitty ear:(
DeleteSo the chain 8 should be a chain 3? My ear has a big hole in the middle and a big chain off one side. I am so confused!
ReplyDeleteYes...and I am sorry about the confusion:(
DeleteI have to say...I am so sorry about the ear confusion. It is definitely ch 3. I'll correct it now.
ReplyDeleteHi there, I am brand new to crocheting without my mom around. I was wondering if you could explain the first row a bit more. The way I see it you ch 3 and the make 7 dhc in the first ch but that is very difficult to do. My mom told me to ch 3, then sl st it into a circle then to make the dhc, but the hat is coming out far too small. I would appreciate any advise or explanation. :) thank you!
ReplyDeleteHello,
DeleteYou will ch 3 and work the 7 hdc in the 3rd chain from the hook, which will actually be the first chain that you made. The chains that you skipped will count as a hdc. So you'll actually have 8 hdc. I hope this helps explain. Let me know if I can help you again:)
Liz
Love this! Made already three! Working on my fourth.
ReplyDeleteGreat...I'm so glad you like the pattern:)
DeleteLove this!! I just wanted to say thank you for the pattern. I will be making it for a little 5 year old girl who is about to lose her hair to Leukemia and LOVES hello kitty!!!
ReplyDeleteThanks and you're welcome. There's no one more deserving...I hope she loves the hat.
Deleteawww prayers sent to the little girl. Just keep Jesus in your heart and pray
DeleteHi Liz I was wondering if you could tell me if there is a secret to getting the braids even on the ear flaps. I am having trouble getting them just even to each other.
ReplyDeleteHi,
DeleteI just count the actual number of braids for each one and match them up. Hope this helps.
Thank for the pattern. I finished it last night for my neice and my 14 year old daughter seen it so now I'm making a few more! :)
ReplyDeleteYou're welcome and I'm so glad they like them:)
DeleteHi. Do I just finished making this for my hello kitty obsessed 3 year old. But I ended up making up the eyes and I'm not happy with them. I can't figure out your instruction saying not to turn but work on the other side? I've tried and do not end up with anything oval shaped. Any Advice or different way to make an oval? Other than that it's super cute and regardless she loves it! Im the one obsessing even when your instructions say not to! ;) either way thank you for the free instructions. I'll def share my finished piece on fb with a link back to the awesome blog that posted it! :)
ReplyDeleteYes, you'll work into the other side of the chain. Going around the chain. I may be confusing you, but I hope not:)
Deletehello Liz ur work is beautiful! im do u sell ur work/ if so how do i buy one of these adorable hats
DeleteI thinks I did something wrong I followed the original pattern and it turned out really small and the ear flaps are really short how many rows should the ear flaps be? Help
ReplyDeleteHi,
DeleteThe earflaps are about 13 rows. You'll start with 13 stitches, then decrease by one stitch on each row till you have only one stitch left.
I didn't crochet this hat too tightly. Usually, I'm a tight crocheter, but not for this one. So if you crochet tightly, you'll end up with a smaller hat. Just use my hat size chart for the body of the hat. Go over to my tips (under the labels section on the right of this blog) and you'll find the post where I have given the measurements to make sizes for various ages.
liz
TOO CUTE! Thanks for sharing!
ReplyDeleteBy the time I get to Rnd 9 of the first part I end up with 71 stitches instead of 64. I'm not sure how this keeps happening. Its like I add an extra stitch each row. :S Will it be okay if I continue with these extra 7 stitches?
ReplyDeleteIt will be ok if it fits. If your gauge is tighter then it will work
DeleteI have just started on this super cute hat, it's gonna be a birthday present for my sons friend. Thank you SO much for sharing the pattern!!
ReplyDeleteI love this pattern and the monkey one too ..I am so glad it's fairly easy in the sense of only using one type of stitch .. as being a Brit .. although we use the same language when crocheting... they MEAN different things - and I have to copy off the pattern, and then use a programme to go through and change all of the hdc's to hTc's so I don't make a mistake !!! I learned to do this the hard way by ordering a pattern from the States..... and going round the bend trying to remember as I went to change every stitch name to the British equivalent!! lol!
ReplyDeleteThank you so much for posting such beautiful things !! I am hooked ! oh .... grief ... a pun !! lol!!
Back again ! I have been checking up the types of wool - so now know worsted is double knitting in English, however, you don't tell us how much we need?? Or have I missed that somewhere ? I note that the skeins in the USA of the type you mention using above come in 3 and half oz balls - so ... how many of those will I need ??
ReplyDeleteSorry to be a nuisance, but thanks for your help !
You are not a nuisance. Don't ever worry about asking questions. I just wish that I could remember to answer all the questions that I am asked. You will only need one ball of the main color...and little balls of the other colors. I used scraps for the red and black and yellow.
DeleteHi! I linked this pattern and picture to my blog. Hope that´s ok? If you want to check it out http://lankaaja.blogspot.fi/2012/09/koukuttaa-kenkakokeiluja-osa-2.html. My youngest just loves this hat!
ReplyDeleteHi! I was just wondering how did you attach the braids? Did you attach 15 pieces to the bottom of the flap and then braid? Or did you braid and then attach somehow? Thanks for any help. Very cute pattern..:)
ReplyDeleteHello,
DeleteFor the braids pull 5 strands into 3 separate spaces near the bottom of the earflap. Pull the ends all the way through until the ends meet. Let me know if I need to explain more.
Liz
I am fairly new to crocheting... would you be up to possibly do a youtube video on how to do this? thanks!
ReplyDeleteI think that would be awesome LOL. I feel so out of practice :(
DeleteI wish that I could find the time. Maybe you could search you tube for a basic hat pattern and then do the other parts of the hat. If you have any specific questions just ask me, I'll try to help:D
DeleteLiz
I found you when I typed in a google search for beanie patterns, I have to say that this hat is adorable and your daughter is beautiful.
ReplyDeleteOk, on to the hat. I know how to knit and crochet, but I tend to have issues reading the patterns, is there a trick to reading them? I would love to make this hat for my niece and something similar for my 3 year old.
Thanks! Your projects are beautiful!
Thanks so much. The trick is to learn the abbreviations. Then you can crochet anything. Let me know if you need help with anything in particular with the instructions.
DeleteWhen you end each round are you doing it with a slip stitch? BC when I am doing that I'm getting a really ugly seam. I was just wondering if there was an easier way to make that seam go away?
DeleteYes...and the seam is ugly. I talked about this in the pattern. Just scroll up and look at what I wrote and one of the photos shows my seam. If you don't want a seam just keep going around and don't join each round.
DeleteLol. Ok. The design to this hat is beautiful, I'm just gonna make the seams joined and continue on :) BC your hat is the closest to hello kitty I've found.
Deletethis is a really cute hat! i attempted to make it and the first hat came out lookin like an infant's hat. i used an H hook. now i am trying it again with a J hook, and it looks like it will fit my 1yr old. what am i doing wrong???? the yarn is 4-ply, worsted weight. am i crocheting too tightly? you say it's meant to fit a child/small adult. mine won't fit either! i am trying to make it for my 4 and 5 yr old. any tips would very helpful ;)
ReplyDeletei think i may have figured it out....i used a magic circle and never chained 2 whenever i got to a new round. i'll give it another shot!!!
DeleteI crocheted a little loose for this hat, definitely not tight. I have to force myself to crochet even a little bit loose. I normally crochet on the tight side.
DeleteI crochet tight as well.. I have found that patterns that work in hdc I have to go up two hook sizes. I made this pattern but worked it in Dc instead of hdc and was able to use an h hook. Hope this helps!
DeleteOn the ears what do you mean two strands of yarn? Did you cut the yarn previously to making the ears our did you use two skeins of yarn?
ReplyDeleteBecoming lol i figured it out XD
DeleteHi, thank you for sharing such a cute pattern. I'm making this for my granddaughter and found I will need to add an additional row or two so that circumference will measure 7 1/2 inches. I was wondering if I will have to skip more than 21 stitches between earflaps if I add additional rows? Thanks again. Love your patterns!
ReplyDeleteIt all depends on the finish measurements. If you increased the stitch count maybe so. I can't tell for sure unless I know the amount of stitches you ended with. If you only added rows, but did not add extra stitches per row, then no.
DeleteLet me know if I can help in the future.
Sorry it took me so long to respond...somehow I overlooked your comment:)
We love Hello Kitty! Linking up tomorrow at Tangled Happy. Wishing you a very happy Friday Liz! :)
ReplyDeleteCould you explain adding an increase? I'm fairly new to crochet. The first one I made was for a child and the next is for an adult. Thanks!
ReplyDeleteHI,
DeleteAn increase is just adding a stitch...like putting 2 single crochets into a stitch instead of only one.
Hope this helps,
Liz
Thanks for such a great pattern - just whizzed one up for my little miss. I'll be posting my FO on Friday if you want to drop on over for a peek.
ReplyDeletexxx
Wow - this will be perfect for my 5yo! Her eyes just lit up when she saw it! Thanks for sharing the pattern!
ReplyDeletewow, I can't wait to try this. thanks for the pattern.
ReplyDeleteI love this pattern and have used it in making many different character hats as well as the hello kitty. I'm not sure if I am doing something wrong when it comes to the seams, but once the hat is on, the seam looks as if it is missing a stitch. My count seems to be correct. I have tried adding a stitch, but then, it looks like I have added a stitch. Any suggestions? Thank you.
ReplyDeleteI'm not sure what is going on. Unfortunately I would have to see a photo to get an idea. I hate the seams. I usually leave it out and not join each round. If you don't want a seam just work the entire hat in a spiral. Hope this helps, liz
Deletethank you for being so kind to share all of your patterns. you are very talented and your patterns have helped me with gifts.
ReplyDeleteHI! I love your pattern and I'm making it now. You said you're not happy with the seam, so you crochet it in rounds (I hate rounds, I always get confused. LOL.) I realized why your seam is so prominent. There are a couple things that will fix that. One, instead of counting the ch2 as a hdc, ch 1 then do a hdc and join into the hdc not the ch (or you can ch 2 and still get a similar effect.) The other thing that will make the seam not quite so out there is to switch the way you do the first few rows. instead of 2 hdc then the individual hdcs, do the individual hdcs first and the seam won't move quite so much. I made the first hat according to your instructions, but the next hats I make I will be making these modifications. I'm going to post a picture of the finished products on my blog if you are interested in seeing it. :-) Here's the link.
ReplyDeletehttp://lntofasinglemom-crafts.blogspot.com/
This is amazing!!!! I'm still fairly new at crochet and knitting but I'm getting really into it and this is the PERFECT Christmas present for my niece who thinks Hello Kitty is the best thing ever. How long did it take you to make?
ReplyDeleteI just wanted to say thank you for creating and sharing this great pattern. I really enjoyed making this hat! I posted pictures on my blog of my finished hat and shared a link to this pattern.....I hope that's ok.
ReplyDeleteHere is a link to my blog if you want to see my finished hat
http://michelleshomelife.blogspot.com/
I did it for my 7-year old girl and she was amazed! It is the first thing I made with crochet. It was easy for a beginner like me. Thanks a lot!
ReplyDeletei made this for my niece she is 3 years old, she absolutly adored it, do you have a mitten pattern for hello kitty.
ReplyDeleteI am making the Hello Kitty hat for a child with cancer. I am using a softer, bulkier yarn. Could you tell me the measurement of the hat from the top beginning circle to the bottom edge? Also the measurement from the top beginning circle to the bottom or ear flap. Thanks for this wonderful pattern. Love it!
ReplyDeleteOMG I love this! Just made one for my daughter today! It turned out perfect!!! Thank you!!! :)
ReplyDeleteHi,
ReplyDeleteThis is a great pattern and I want to make it for my daughter for Hannukah. How many skeins of white did you use? Or can you give me the yardage? I live in Iceland and will order the yarn, probably use Debbie Bliss or Rowan and would likt ot know the amounts. Thanks!
Andrea
I only used one skein or about 3.5 ounces of white...maybe less than 170 yards.
DeleteThanks and I hope you like your hat:)
I am relatively new to crochet an I am still figuring out which brand of yarn i like best and for what...but i have learned that sizes seem to change due to the brand of yarn. I crochet pretty tightly myself and i found that caron yern makes the pattern close to the size shown and red heart tends to make it larger and any type of baby yarn makes it smaller. I have seen that a few people are having a problem with size and i thought this might be helpful. Also when i first started with hats i descovered that i wasn't infact crocheting properly and the way i was doing it worked fine for granny squares blankets and scarves but not for hats. So if your hat is flat on top or often small you might have someone check your stitches for you. Hope this is helpful. Also hope i didn't step on your toes to much Liz
ReplyDeleteThis comment has been removed by the author.
Delete
DeleteNo worries. you are right...yarn type, tension, hook size...everything dictates what size you get when crocheting hats and garments. The best way to get the desired size is to follow gauge. I know many people don't swatch first, so when making hats, the post about hat sizes is the best way to get the desired size. This will eliminate guessing and wondering. Here's the link: http://crochetincolor.blogspot.com/2012/06/trying-to-customize-hat-sizes.html
I posted about this back in June.
Thanks,
Liz
these are very lovely... thankyou for your generosity in sharing your pattern <3 :)
ReplyDeleteGod Bless!
Thanks for sharing, Just finish it.. I'm sure my little friend Nadia is going to like it..Blessings :)
ReplyDeleteSo glad I found this pattern. I'm working on it right now and can't wait to finish it. Thanks for sharing your work.
ReplyDeleteCuuuuuuuuuuute, LOL I wonder if a 44 year old mom can get away with wearing this rofl
ReplyDeleteof course...why not;)
Deletei was wondering
Deletethe same an im 46
I love your hat!!
ReplyDeletethanks so much
DeleteI'm trying to make a hat from this pattern for a 2 yr old, but I'm not quite understanding what you mean by "take out an increase row and an even row." I assume you mean to stop increasing once you've reached the right size, but I'm not sure what it means to take out an even row.. I'm sorry, I'm fairly new at making hats, so I'm still learning.
ReplyDeleteyes you will stop increasing. Taking out an even row means you will stop one round short of what the pattern calls for. For sizing I would recommend using the hat size chart.
Deletehttp://crochetincolor.blogspot.com/2012/06/trying-to-customize-hat-sizes.html
Hope this helps:)
this is great! My daughter LOST IT when she saw the picture of this. She's so excited.
ReplyDeleteThis is awesome! Just whipped out two of them for Christmas gifts. Your pattern is well written and easy to follow. Thank you for sharing! <3
ReplyDeleteYou're welcome and I hope you love it
DeleteThis comment has been removed by the author.
ReplyDeleteI am having trouble with the hat sizing. I looked at your chart but I am still confused on your instructions when you say for a toddler to take out an increase row and an even row. I made this hat for my little two year old girl following your instructions but it didn't fit. Should I still start the hat with the ch 2 then 7hdc or do I change the numbers? I'm sorry for asking when you posting the chart sizing but I am still really confused. Thank you for posting this hat and helping everyone that has asked you questions :)
ReplyDeleteWhen I say take out a row, you will not crochet one of the increase rounds in the pattern. I think the first 8 rounds are increase rounds. To decrease the size only do 7 increase rounds, then start with your even rounds (meaning one stitch in each st...no increases) Hope this helps,
DeleteLiz
Love, love, love this pattern! And I know two little girls who will love, love, love the hat. Thanks so much for sharing the pattern :)
ReplyDeleteYou're welcome and I hope the little ones love it too
DeleteFound you on pinterest, and I made the hat for both of my girls, and now I'm making some for nieces, everyone just loved loved loved the hat. Linked the pattern and a picture in my blog, gotta give credit. :) thank you for sharing this pattern!
ReplyDeleteAmanda K
pinterestfreak.wordpress.com
Thanks so much and you're welcome:)
DeleteI cannot knit of crochet, but I can sew!...but this hat has got to be the cutest ever!
ReplyDeleteMust have the pattern!...maybe I can learn before my 61st BD...wait...make that 62 as my 61 BD's in 6 weeks! LoL!
Thanks so much. You can do it...we never stop learning and creating
DeleteHello, I love this pattern, and I am going to attempt it for my niece as a Christmas present. I have a question about the actual ears on the hat; did you crochet the ears separate like the eyes and nose and then sew them on? This is for the actual kitty ears, not the ear flaps. Thank you for this great pattern! I am new to crochet, so I hope I can tackle this :-D
ReplyDeleteSo sorry for being so slow in responding. Yes I did crochet them in separate pieces. You are welcome and I hope you love it,
DeleteLiz
Thanks for this pattern .
ReplyDeleteI am making this hat for my granddaughter
And although following the pattern gave me a pointy hat :) , it still is handy to have a pattern to give me an idea of what to do next. I am no good at starting something like this from scratch.
The pointy hat is probably because of the gauge of my yarn but I also have 64 stitches and can work with the rest of the pattern nicely.
I'm off to making the ears and the bow now but I wanted to mention this for those that have problems with the ovals, you can make an ordinary round and then with a needle you thread the end of yarn you get when tieing offthrough the round from side to side and pull it slightly and there you have an oval :).
I'll put the finished hat and a link to your blog on my blog as soon as it's ready.
(will let you know here as well then)
Greetings, An
Ok great. Thanks so much and you're welcome:)
DeleteOmg I love this pattern. I found it the other day. I wished I would have found it a few months ago when I bought my hello kitty fur hat with long ear flaps with pockets. I looks exactly the same down to the red bow and yellow nose.
ReplyDeleteMy neighbor was talking about buying a hat similar for his daughter. As he was describing the hat I showed him mine. He loved it cause his daughter likes cats. I remember seeing hello kitty crochet hats and loved yours the most. Told him to save his money I would make her one for christmas. I had the materials already.
So I started it right away. I was suprised how easy it was to make. I haven't crocheted anything in years so I need a refresher on some of the stitchs.
I am down to sewing on the pieces im just having an issue with the braids how do I attach them? How long do the strands have to be? This part confuses me. Also on the ear flaps at the end you say 3sc's on the ear flap points does this include where the hat and flaps meet. If not I found I had larger holes there and thought it looked nicer with 3sc's in these 4 spots.
Time it took me to make it 10hrs :o)
I made the braids using 6 strands at 30" each (per side). Fold the strands in half so you have 12 15" strands. Pull the folded end through a hole at the bottom of the ear flap from the outside. Just find a hole that's centered (ish) . Then pull the strands through the loop created by the folded end and tighten. That should give you a nice looking knot. Then just braid the yarn until you are about 2" from the bottom and tie a knot.
DeleteThanks so much for helping me out here:D I'm so slow here lately with responding to questions. I get a lot.
DeleteLiz
Thank you for this pattern! I have made quite a few for my daughter and her friends. My daughter gets compliments every time she wears it!
ReplyDeleteYou are welcome...I'm so glad you love it:)
DeleteSuch an adorable pattern!! Thank you for sharing! I'm doing a round up of my favorite hats on my blog post on Dec. 24th. I would love to put a picture and link to this pattern, if that's ok with you.
ReplyDeleteWow! I'm so glad I found your blog. What a wealth of information!
Sure that would be great. Thanks so much
DeleteThis comment has been removed by the author.
ReplyDeleteSUPER cute. I saw this patten via Pinterest and three days later Voila --> <a href="http://www.flickr.com/photos/airrikajswan/8307026581/</a> Thank you so much!! The little girl I made it for will LOVE it.
ReplyDeleteYou're welcome and I love yours. It turned out perfect:)
DeleteHello! :)
ReplyDeleteI'm attempting to follow the no-seam version of your pattern and have a quick question. Is the join the only part you leave out? I wasn't sure if I'm still supposed to ch 2 and hdc in the same st at the beginning of each round.
Thanks!
Jess
Hi Jess,
DeleteYou will just hdc all the way until you reach desired length...no ch.
For the increase rounds you will replace that ch 2 with a hdc.
Remember you'll be going around continuously so there will be no need for a join.
Thank you so much for your awesome pattern. I made the base hat last night and my 3 years cannot wait to have it finished for her today. I so appreciate people sharing their patterns as I just don't have the talent to write them myself. Very cute and easy to follow, thank you!
ReplyDeleteyou're welcome and thank you:)
DeleteThis comment has been removed by the author.
ReplyDeleteThanks for the awesome pattern!
ReplyDeleteYou're welcome:)
DeleteHow do you make and attach the braids?
ReplyDeleteSo sorry I didn't respond in a timely manner.
DeleteFor the braids you will pull the strands through a space in the bottom of the earflap. Pull through till the ends meet. DO this three times, evenly spaced. Then braid the three groups of strands of yarn.
Boy, did i just confuse you more?
Happy New Year! My daughter found this on Pinterest - and asked me to make it for my grandaughter! Now .. after making a complete 'pig's ear' shall we say out of another pattern a few years back [ I am a Brit so as you know, our stitch names are the same but - we mean different things - and I was going not so gently round the bend with that item as it was a complicated piece!] I was a bit wary - but as there are few different stitches in this hat, I managed !!! Of course, I chose a nice 'sparkly' sort of yarn, and discovered it was a ... pain .. to work with !! However, I managed .. and have posted it off - I live in Portugal and they live in Scotland ... and am waiting for daughter to retrieve it from the post office on Monday!! I am more excited than she is ... I want to know what my 4yr old grandaughter thinks of it !!!
ReplyDeleteIn the meantime, I have made up the sock monkey hat for my grandson, aged 7 yrs, - and am just going to make the pom pom and buy some buttons but otherwise it's finished! I am not great at pom poms ...so wish me luck !!
Will report back with the 'comments' from the children asap. Thank you SO much for making such lovely patterns available to us !!
Hi! First, thank you for the pattern. I am fairly new to crocheting and I am having trouble with a few things.
ReplyDelete1) When I am making the eyes, I am ending up with ovals but they have 2 gaps (holes) in the middle of them. Any idea what I could be doing wrong or how to fix it?
2) I am lost when it comes to the ears. What do you mean that you hold 2 pieces of yarn together? I saw someone else ask this and then they said that they had figured it out on their own so they no longer needed the answer.
Thanks for your time and help.
About the holes in the center...make sure you crochet over your beginning tail then pull the tail tightly and it closes the hole.
DeleteYou will take two strands of yarn and hold them together and crochet like you are only holding one.
I hope this helps...let me know if I need to explain myself more
This is super!! Thank-you so much for sharing!!!
ReplyDeleteYou're welcome and thank you:)
DeleteI saw this and had to make it. Gave it to a friend for her little girl, ADORABLE. Easy and I am very happy with the results. Thanks!!!
ReplyDeleteYou're welcome and I'm so happy you liked the end result
DeleteThanks you so much for this super pattern hook ! I'm French and i understand everything in your instructions. I make one too for my great-niece, and i thinks she will be very happy with this Hello Kitty Hat !!! thanks you again for sharing !!
ReplyDeleteYou're welcome and thank you for the feedback,
DeleteLiz
Hi Liz your work is so good! i already made this hat in brown and pink for my best friend's daughter and also made the monkey hat for my son they look great, Thanks for sharing!!
ReplyDeleteThanks so much and I'm so happy that you like the patterns here
DeleteThat for the great pattern. I made one for my grand baby and it is adorable on her. http://crochetincolor.blogspot.com/2012/03/hello-kitty-hat-pattern.html
ReplyDeleteYou're welcome. I'm so glad you liked the hat:)
DeleteI made the hat for my two year old little girl using the H hook but it is too small :0( maybe I crochet too tightly.
ReplyDeleteThe same happened too me! I really hope she replies to us :)
DeleteThis comment has been removed by the author.
ReplyDeletehi liz...
ReplyDeletegreat job....thanx for sharing...
also i want to crochet a chicken hat n diaper in this link: http://www.etsy.com/listing/79542333/piglet-hat-diaper-cover-set-inspired-by?ref=sc_1
can you help me?
thanx
I made this for my 7 year old, she LOVES Hello Kitty. Thanks so much for sharing the pattern :) You did a great job writing it out!
ReplyDeleteTHanks so much and I'm so glad you like the pattern
Deletehi liz,im a new follower on you blog,great work,im a beginner learner so im having problems reading your abr for the stiches since im learning but the englis abrev in london,can u help,yhank you.oops sorry my name is rosita.
ReplyDeleteHi there, I was wondering if it's OK to sell items using your patterns? I would link back to your page :)
ReplyDeleteThanks,
Lexie
Hi Lexie,
DeleteSo sorry I didn't respond sooner. Somehow I missed your comment. You can sell whatever you want. No problem. A link back would be very considerate of you.
Thanks so much,
Liz
Thanks for sharing this pattern! I found it on Pinterest awhile back. My 3 1/2 year old saw it today when I was looking for something on my knit/crochet board and about climbed on the desk. She loves Hello Kitty (I haven't figured out why or how - I'm not a fan). So guess what just jumped to the top of my patterns to do pile ;) Love it!
ReplyDeleteBeth
You're welcome...my daughter also loves Hello Kitty and like you, I haven't really payed much attention to the whole Hello Kitty craze. It is everywhere and I guess we can't avoid it. I hope she loves the hat.
DeleteLiz
Hi
ReplyDeleteLoved this hat
Thinking to make can you share with step by step pictures or any video?
Once you get to the earflaps, row 2 says: Sc2tog over, I am kind of new to this, can you explain this?
ReplyDeleteI too have a question about this. Did you ever figure this out?
DeleteThank you for posted this. i have been looking for a pattern for a hello kitty hat for months.
ReplyDeleteOk so I did everything on this pattern and the hat turned out extremly small for my toddler:0/ help! I looked at the sizing link as well what could I of done wrong?
ReplyDeleteI finished my hat last night and it is adorable!! Thank you so much for the pattern! Ear flaps came out perfect. I wish I could post a picture!
ReplyDeleteOh fun. my mom bought one for my daughter last year, it was a big hit. the other kids are jealous... i was a bit bewildered as to why my mom would not just send me a pattern because I do crochet... but you know how mom's just want to buy grandkids stuff... anyway, i'm going to make this one for my niece :)
ReplyDeleteRealy all baby hats is so nica and this information is so good and helpful for us.
ReplyDeletecrochet baby hats
This is so stinking cute, thank you so much for the free pattern. I'm pinning this for later, I definitely know what my niece is going to get for Christmas.
ReplyDeleteThank you for this really easy to follow pattern!
ReplyDeletexo,
Gwen
I love your patterns and the picture of your daughter are adorable. Thanks so much for sharing... I am make a 2nd Hello Kitty hat and thought I'd write to thank you. I have also made 3 monkey hats!
ReplyDeletelove the patern going to make a Kitty for my friends granddaughter.Thank you for sharing
ReplyDeleteHello,
ReplyDeleteI recently found your pattern and I love it, but I must admit I am having a bit of a hard time understanding it. Thanks for the pattern. (:
Thank you for sharing this pattern! A friend of mine made it and posted to facebook, so I had to come hunt it down. My teenager is going to love this for Xmas!!
ReplyDeleteTnks for the pattern. Im making 2 for my daugthers. They looveeee h.kitty.
ReplyDeleteHi, thanks for your pattern I love it I will be making one for my baby ;) if you ch1 instead of ch2 you won't have a seam :)
ReplyDeleteMaking this for my daughter for Xmas.. almost done!!
ReplyDeleteThanks for the tutorial!! I made one for my little niece, and right now making the second for an older niece...!!! perfect for Christmas gifts!!!
ReplyDeleteThanks for posting your pattern! I've made about 3 of them for gifts for some of my nieces!! I will be making one more for my 9 y/i daughter who loves HK!
ReplyDeleteI've had this pinned on Pinterest forever and finally got around to making it tonight. I was amazed to be able to start and finish all in one night! Your pattern was written so well and was so easy to follow that it was a breeze. My 3-yr-old is gonna LOVE it! I see several more hats in my future for my other daughters. :) Thanks for sharing!
ReplyDeleteHi, thank you so much for the pattern..i made one for my grandaughter and she loves to show it off...
ReplyDeleteI really like this pattern. I made the hat but I couldn't figure out how you did the braids - how you attached them to the ear flaps. If you could give a little more detail on how to do them, I would really appreciate that. I like the look of the braid that you did. Thanks & have a great day.
ReplyDeleteMy daughter and everyone that sees this hat loves it!
ReplyDeleteIs this an easy pattern>?? My daughter is going to be 4 Saturday (March 1,2014) and shes huge on Hello Kitty. and I'm a newbie at Crocheting
ReplyDeleteplease if you can email me at k.trost@aol.com....I don't know if Ill be back on laptop but emails go to cell
DeleteLiz, thank you so much for the pattern. I wanted to ask a question about joining after each round. Are you crocheting into the "join stitch" from the previous round or are you skipping it and then joining the last row stitch with the first HDC? Hope my question wasn't confusing. I'd greatly appreciate your help. Thanks!
ReplyDeletewhat a cute pattern! My 23 year old daughter wants me to make her one...so, will start tomorrow! Thank you for the pattern!
ReplyDeleteI hope I didn't miss a comment about this earlier on, but is there a particular place that you put the ears (a certain round?) or did you just eyeball it? Love this pattern. Thank you!!
ReplyDeleteFound this on Pinterest and my daughter can't wait for me to make this for her. Thank you!
ReplyDeleteFound this on pinterest and making it for my niece as an Xmas present! Thanks!
ReplyDeleteI love this pattern but I have never crochet following a pattern. Can someone please point me towards a site where I can find explanations for all the abbreviations used?
ReplyDeleteF.ex. as in: "Rnd 1: Ch 3, 7 hdc in 3rd ch from hook. Join with sl st. (8 hdc the first 2 chains count as the first hdc of the rnd)"
Thanks a million in advance :-), Steph.
Hermoso y las instrucciones sencillas.
ReplyDeleteI used simple soft yarn and used 2 strands for the hat. I also used 2 strands for the bow and it doesn't curl at all. I also made the ears a little bigger by adding 1 more row, doing a single crochet in the singles and 1 double crochet in the doubles then fastened off. Thank you for sharing.
ReplyDeleteSuch a gorgeous hat! I must try one for myself! Totally in love with all thinks Hello kitty <3
ReplyDeletehttp://ki-tycrochet.blogspot.co.uk/
so, for each round, do I follow the pattern as is, or is it round 1 then regular stitch a round, then round two? I tried like 6 times to follow the pattern as is, but kept ending up with what looked like an extreme preemie hat that kept collapsing on itself. slightly confused...
ReplyDeletefigured that part out, but am now confused as to round three. after I hdc in the next stitch, what stitch do I do for the rest of the rounds?
DeleteDid you figure it out?
DeleteThank you for the wonderful pattern! I find the ears easy to make. My friend's daughter is turning one and she wanted a hello kitty hat for her costume. :) I'm a social worker too and crocheting really is my hobby a good stress reliever! Thank you!
ReplyDelete